Fit-Meter
About the Application
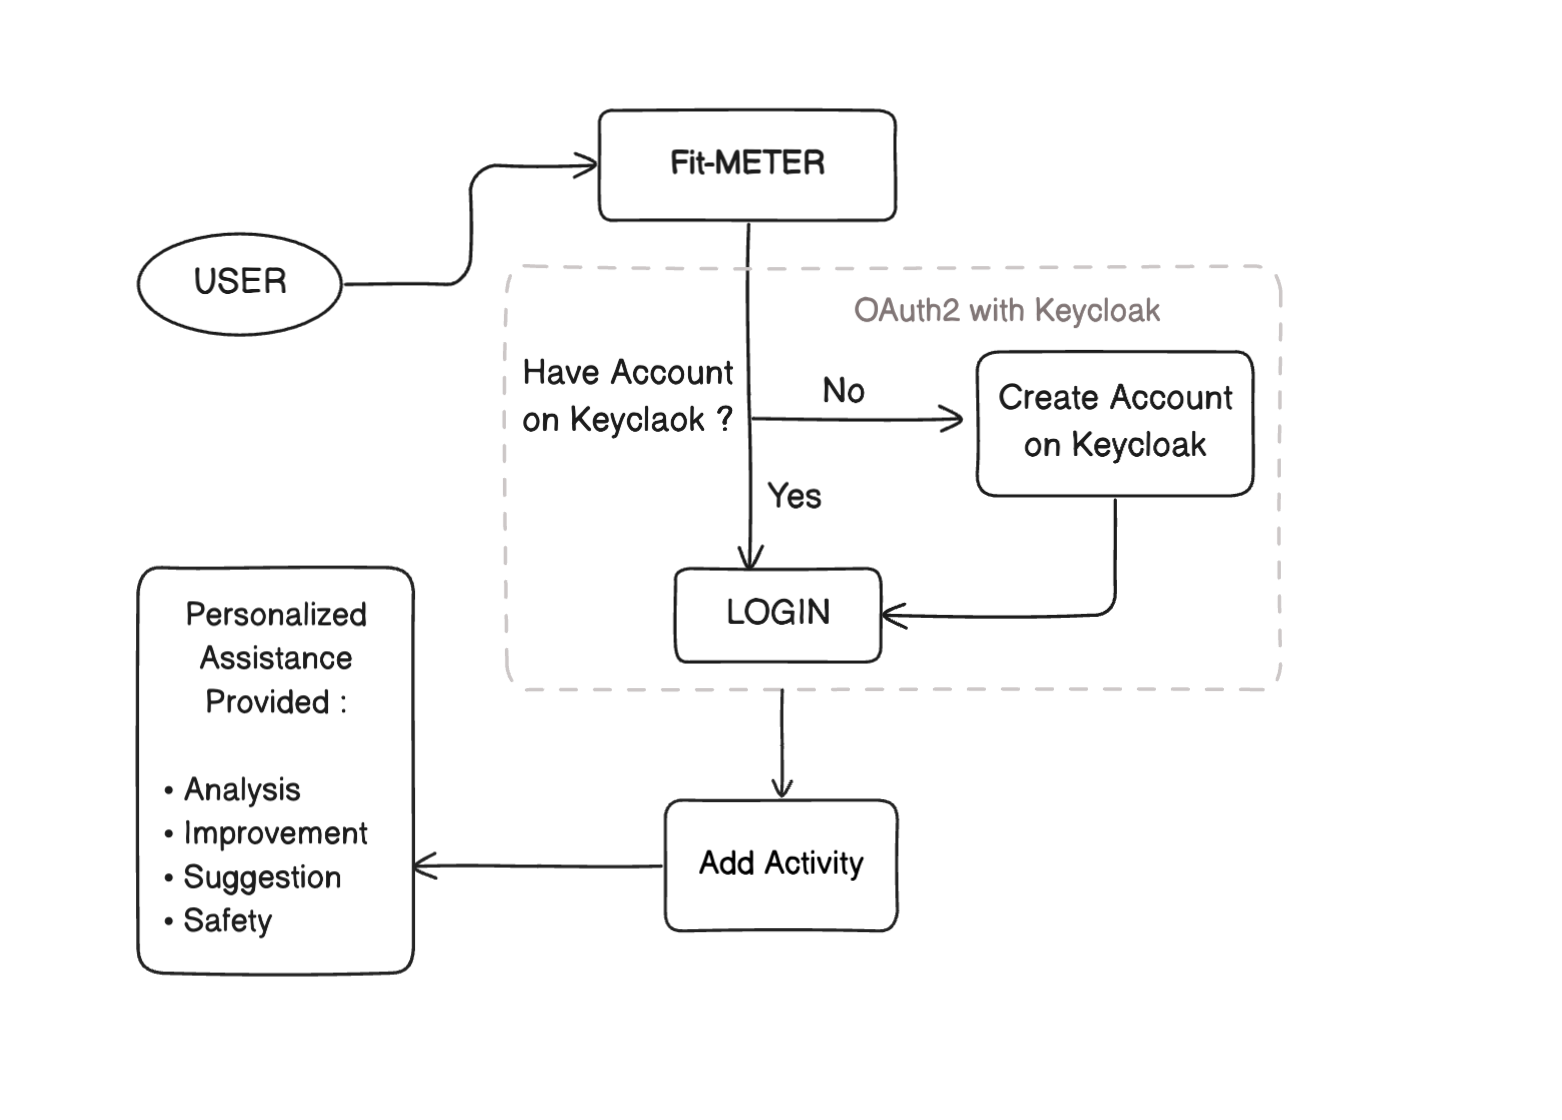
This fitness application is designed to be your personal digital fitness coach.
It doesn’t just track your activities — it helps you understand them.
With every activity you perform, the app:
- Measures your performance → tracks details like calories burned, duration, distance, and speed.
- Analyzes your progress → identifies strengths and areas that need more focus.
- Provides smart recommendations → suggests what activity you should try next.
- Keeps you safe → gives guidance on precautions and safety measures to avoid injury or overtraining.
The goal is simple: to turn raw fitness data into actionable insights that help you stay consistent, improve steadily, and build a healthier lifestyle.
Check out the full source code on GitHub
Project Setup Guide
This guide helps you set up and run the full backend project locally, including all microservices, Eureka server, API Gateway, RabbitMQ, and Keycloak using Docker.
1. Prerequisites
Make sure you have the following installed:
- Java 17+
- Maven
- Docker & Docker Compose
- Postman (optional, for testing APIs)
- Ports: Ensure the following ports are free:
- Keycloak: 8080
- RabbitMQ: 5672
- Eureka Server: 8761
- Config Server: 8888
- Gateway: 8081
- Microservices: 8082, 8083, 8084 (users, activity, AI)
2. Project Structure
Project contains the following modules:
backend/
├── config-server
├── eureka-server
├── api-gateway
├── user-service
├── activity-service
├── ai-service
├── docker images running in backgroud
│   ├── rabbitmq
│   └── keycloak
- config-server: Centralized configuration for all microservices.
- eureka-server: Service registry for microservices.
- api-gateway: Gateway for routing API requests to services.
- user-service: Handles user registration and authentication.
- activity-service: Tracks fitness activities.
- ai-service: Provides AI-powered analysis and recommendations.
- docker: Contains Docker setup for RabbitMQ and Keycloak.
3. Setup Docker Services
- RabbitMQ
Run RabbitMQ container:
docker run -d --name rabbitmq -p 5672:5672 -p 15672:15672 rabbitmq:3-management
- Management UI: http://localhost:15672
- Default credentials: guest / guest
- KeyCloak
Run KeyCloak container:
docker run -d --name keycloak -p 8181:8080 \
-e KEYCLOAK_USER=admin \
-e KEYCLOAK_PASSWORD=admin \
quay.io/keycloak/keycloak:20.0.3 start-dev
- Admin console → http://localhost:8080
- Default credentials → admin/admin
Configure realms, clients, and users via Keycloak UI.
4. Configure the Project
- Clone the Repository
git clone https://github.com/g14ayushi/FitMeter
cd FitMeter
- Configure AI Service
Inside configserver/src/main/resources/config/ai-service.yml, you will see the following environment variables:
gemini:
  api:
    url: ${GEMINI_API_URL}
    key: ${GEMINI_API_KEY}
Set the environment variables before running the service:
For MacOs:
  export GEMINI_API_URL=https://api.gemini.com/v1
  export GEMINI_API_KEY=your-secret-key
These will be used by the AI Service for external API integration.
5. Start Config Server and Eureka Server
- Run Config Server:
cd configserver
mvn spring-boot:run
Default Port: 8888
- Run Eureka Server:
cd eurekaserver
mvn spring-boot:run
Once it starts, you can access the them Dashboard at:
http://localhost:8761
6. Start API Gateway
cd gateway
mvn spring-boot:run
- Gateway port: 8081
- All requests are routed via the gateway.
7. Start Microservices
Start the microservices in this order:
- User Service
cd user-service
mvn spring-boot:run
- Activity Service
cd activity-service
mvn spring-boot:run
- AI Service
cd ai-service
mvn spring-boot:run
- Ensure each service
application.ymlhas the correct configuration
8. Access RabbitMQ
- Management UI → http://localhost:15672
- Default credentials: guest / guest
Microservices communicate asynchronously through RabbitMQ queues.
9. Access Keycloak
- Admin Console → http://localhost:8080
- Login with the admin account you created during setup.
Steps:
- Create a Realm (e.g.,
fitmeter). - Add Clients (microservices and gateway).
- Configure Roles (e.g.,
USER,ADMIN). - Create Test Users and assign roles.
Each microservice validates JWT tokens issued by Keycloak for OAuth2 authentication.
10. Test APIs
Use Postman or cURL to test endpoints via the API Gateway (http://localhost:8081).
- Register a User
POST http://localhost:8081/users/register
- Add an Activity
POST http://localhost:8081/activities/register
- Get AI Recommendations for an Activity
GET http://localhost:8081/recommendations/activity/<activityId>
- All requests must include the Authorization header with a valid Keycloak token:
Authorization: Bearer <access_token>
How Users Can Use the Application
Getting started with our fitness app is simple and straightforward.
1. Register Yourself
2. Log Your Activities
3. Get Personalized Recommendations & Analysis
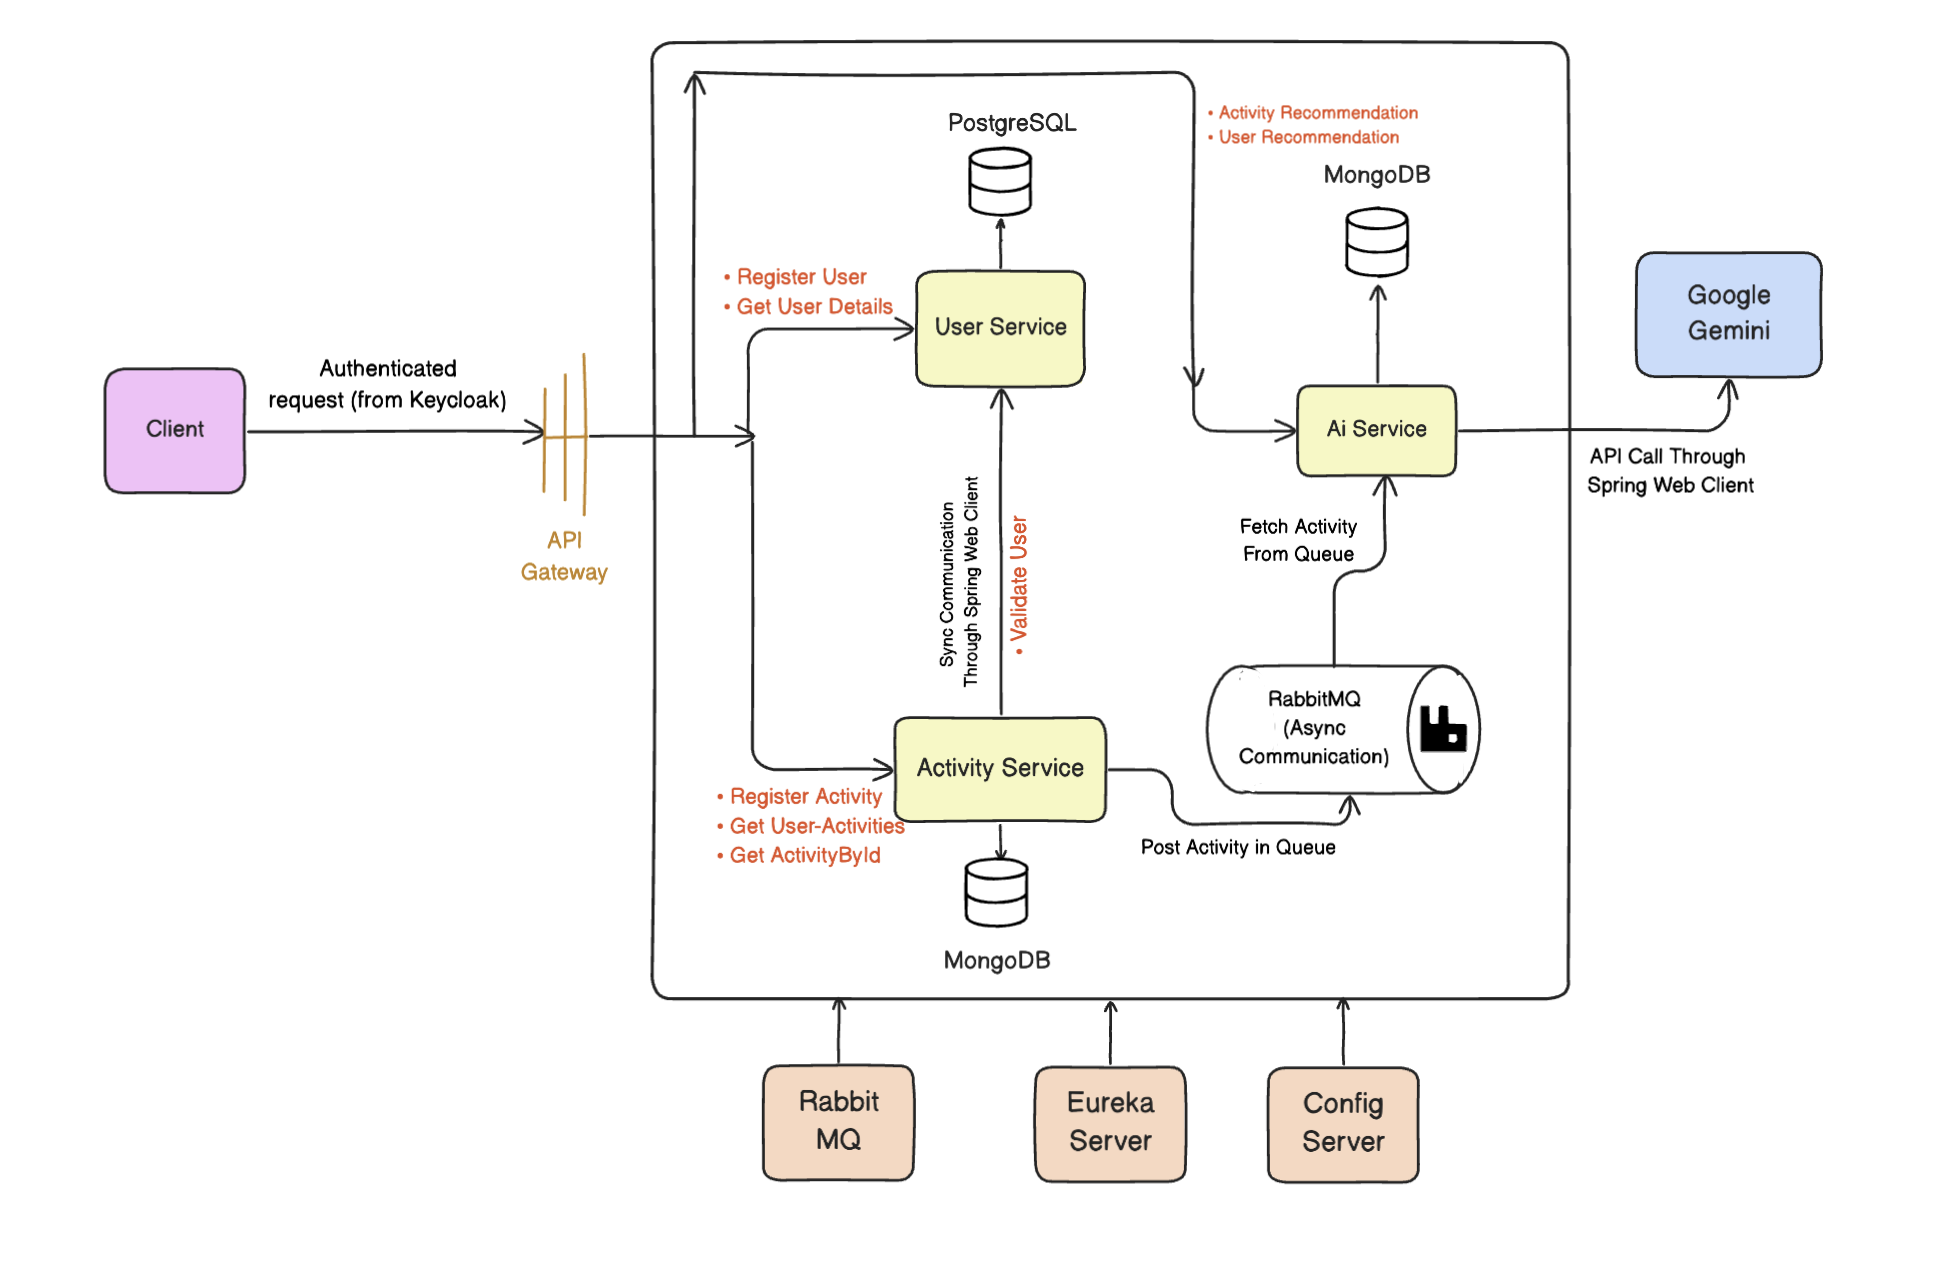
System Architecture
Our application follows a microservice architecture instead of a traditional monolithic design.
It is composed of three independent services:
- User Service – manages user registration, authentication, and profiles.
- Activity Service – handles logging and storage of fitness activities with metadata.
- AI Service – analyzes user data and generates personalized recommendations.
Each service has its own database, ensuring data isolation and independence.
The services communicate with each other using Eureka Server for service discovery and Spring WebClient for inter-service calls.
To simplify external access, there is a single endpoint exposed through the API Gateway. Every incoming request is routed to the correct microservice.
For authentication, the application uses Keycloak with OAuth2 + PKCE flow to secure requests and manage user authorization.
Architecture Diagram
Core Components Explained
Microservice vs Monolithic Architecture
- Monolithic → One large application where all features are tightly coupled and deployed together. Easier to start, but harder to scale and maintain.
- Microservices → Application is divided into smaller, independent services that communicate with each other. Each service can be developed, deployed, and scaled independently.
Eureka Server
WebClient
API Gateway
Keycloak
RabbitMQ
Backend APIs
User Service APIs
- Register a new user
POST /api/users/registerAuthorization Header: Bearer <access_token>
Request Body: { “firstName” : “user1”, “lastName” : “LastName1”, “email” : “user1@gmail.com”, “password”: “Password1” }
Response: { “firstName”: “user1”, “lastName”: “LastName1”, “email”: “user1@gmail.com”, “password”: “dummyPassword123”, “id”: “86e4fffb-6570-4b2b-a85f-cde77d8103d6”, “createdAt”: “2025-09-15T18:14:20.732206”, “updatedAt”: “2025-09-15T18:14:20.732403”, “keyCloakId”: “49d45cbb-a7b0-46c6-a198-6728ce1dca52” }
- Fetch User Details
GET /api/users/<id>Authorization Header: Bearer <access_token>
Response: { “firstName”: “user1”, “lastName”: “LastName1”, “email”: “user1@gmail.com”, “password”: “dummyPassword123”, “id”: “86e4fffb-6570-4b2b-a85f-cde77d8103d6”, “createdAt”: “2025-09-15T18:14:20.732206”, “updatedAt”: “2025-09-15T18:14:20.732403”, “keyCloakId”: “49d45cbb-a7b0-46c6-a198-6728ce1dca52” }
- Validate User
GET /api/users/validate/<keyCloakId>Authorization Header: Bearer <access_token>
Response: true
Activity Service APIs
- Register an activity
POST /api/activities/registerAuthorization Header: Bearer <access_token>
Request Body: { “userId”: “49d45cbb-a7b0-46c6-a198-6728ce1dca52”, “duration”: 45, “caloriesBurned”: 500, “startedAt”: “2025-06-07T10:00:00”, “type”: “SWIMMING”, “additionalmetrics”: { “distance”: 0.6, “averageSpeed”: 0, “maxHeartRate”: 98 } }
Response: { “id”: “68e3ac9ec323b1b15867eb01”, “userId”: “49d45cbb-a7b0-46c6-a198-6728ce1dca52”, “type”: “SWIMMING”, “duration”: 45, “caloriesBurned”: 500, “startedAt”: “2025-06-07T10:00:00”, “additionalmetrics”: { “distance”: 0.6, “averageSpeed”: 0, “maxHeartRate”: 98 }, “createdAt”: “2025-10-06T17:18:46.103251”, “updatedAt”: “2025-10-06T17:18:46.103251” }
- Fetch user activities
GET /api/activitiesAuthorization Header: Bearer <access_token> Header: X-User-Id: <keyCloakId>
Response: [ { “id”: “68e3ac9ec323b1b15867eb01”, “userId”: “49d45cbb-a7b0-46c6-a198-6728ce1dca52”, “type”: “SWIMMING”, “duration”: 45, “caloriesBurned”: 500, “startedAt”: “2025-06-07T10:00:00”, “additionalmetrics”: { “distance”: 0.6, “averageSpeed”: 0, “maxHeartRate”: 98 }, “createdAt”: “2025-10-06T17:18:46.103”, “updatedAt”: “2025-10-06T17:18:46.103” }, { “id”: “68e3b40cc323b1b15867eb02”, “userId”: “49d45cbb-a7b0-46c6-a198-6728ce1dca52”, “type”: “WALKING”, “duration”: 65, “caloriesBurned”: 50, “startedAt”: “2025-09-07T10:00:00”, “additionalmetrics”: { “distance”: 1.2, “averageSpeed”: 4, “maxHeartRate”: 97 }, “createdAt”: “2025-10-06T17:50:28.804”, “updatedAt”: “2025-10-06T17:50:28.804” } ]
- Fetch Activity By ID
GET /api/activities/<id>Authorization Header: Bearer <access_token>
Response: { “id”: “68e3ac9ec323b1b15867eb01”, “userId”: “49d45cbb-a7b0-46c6-a198-6728ce1dca52”, “type”: “SWIMMING”, “duration”: 45, “caloriesBurned”: 500, “startedAt”: “2025-06-07T10:00:00”, “additionalmetrics”: { “distance”: 0.6, “averageSpeed”: 0, “maxHeartRate”: 98 }, “createdAt”: “2025-10-06T17:18:46.103”, “updatedAt”: “2025-10-06T17:18:46.103” }
AI Recommendation APIs
- Fetch Activity Recommendation
GET /api/recommendations/activity/<id>Authorization: Bearer <access_token>
Response: { “id”: “68e3aca654aafc5e6a2e899a”, “activityId”: “68e3ac9ec323b1b15867eb01”, “createdAt”: “2025-10-06T17:18:54.641”, “userId”: “49d45cbb-a7b0-46c6-a198-6728ce1dca52”, “activityType”: “SWIMMING”, “analysis”: “Overall: "The swimming activity shows a moderate effort with a calorie burn of 500 in 45 minutes…"\n\nPace: "Given the duration…"\n\nHeart Rate: "A max heart rate of 98 is very low…"\n\nCalories: "Burning 500 calories in 45 minutes…"\n\n” “improvements”: [ “Area: "Pace and Distance"\nRecommendation: "Focus on increasing the swimming pace…"\n\n”, “Area: "Heart Rate Intensity"\nRecommendation: "Increase the intensity of the workouts…"\n\n”, “Area: "Technique"\nRecommendation: "Refine swimming technique to improve efficiency…"\n\n” ], “suggestions”: [ “WorkOut: "Interval Training Swim"\nDescription: "Warm-up for 5 minutes…"\n\n”, “WorkOut: "Distance Swim with Focus on Technique"\nDescription: "Warm-up for 5 minutes…"\n\n”, “WorkOut: "Drill-Based Swim"\nDescription: "Warm-up for 5 minutes…"\n\n” ], “safety”: [ “Stay hydrated by drinking water before, during, and after your swim.", “Always warm-up before swimming to prepare your muscles and prevent injuries.", “Be aware of your surroundings and swim in designated areas.", “If you are new to swimming or have any underlying health conditions, consult with a doctor…", “Never swim alone.", “Know your limits and avoid overexertion." ] }
- Fetch User Recommendations
GET /api/recommendations/user/<keyCloakId>Authorization: Bearer <access_token>
Response: [ { “id”: “68e3aca654aafc5e6a2e899a”, “activityId”: “68e3ac9ec323b1b15867eb01”, “createdAt”: “2025-10-06T17:18:54.641”, “userId”: “49d45cbb-a7b0-46c6-a198-6728ce1dca52”, “activityType”: “SWIMMING”, “analysis”: “Overall: "The swimming activity shows a moderate effort with a calorie burn of 500 in 45 minutes…"\n\nPace: "Given the duration…"\n\nHeart Rate: "A max heart rate of 98 is very low…"\n\nCalories: "Burning 500 calories in 45 minutes…"", “improvements”: [ “Area: "Pace and Distance"\nRecommendation: "Focus on increasing the swimming pace…"", “Area: "Heart Rate Intensity"\nRecommendation: "Increase the intensity of the workouts…"", “Area: "Technique"\nRecommendation: "Refine swimming technique to improve efficiency…"" ], “suggestions”: [ “WorkOut: "Interval Training Swim"\nDescription: "Warm-up for 5 minutes…"", “WorkOut: "Distance Swim with Focus on Technique"\nDescription: "Warm-up for 5 minutes…"", “WorkOut: "Drill-Based Swim"\nDescription: "Warm-up for 5 minutes…"" ], “safety”: [ “Always warm-up before swimming to prepare your muscles and prevent injuries.", “Stay hydrated by drinking water before, during, and after your swim.", “Be aware of your surroundings and swim in designated areas.", “If you are new to swimming or have any underlying health conditions, consult with a doctor or qualified swimming instructor before starting a new workout routine.", “Never swim alone.", “Know your limits and avoid overexertion." ] }, { “id”: “68e3b41a54aafc5e6a2e899b”, “activityId”: “68e3b40cc323b1b15867eb02”, “createdAt”: “2025-10-06T17:50:42.186”, “userId”: “49d45cbb-a7b0-46c6-a198-6728ce1dca52”, “activityType”: “WALKING”, “analysis”: “Overall: "The activity indicates a light-intensity walk. The duration is adequate, but the calorie burn is very low…"", “improvements”: [ “Area: "Intensity"\nRecommendation: "Increase walking pace to elevate heart rate…"", “Area: "Incline"\nRecommendation: "Incorporate hills or use a treadmill with an incline…"", “Area: "Duration"\nRecommendation: "Gradually increase the duration of the walks…"", “Area: "Weight"\nRecommendation: "Consider using a weighted vest or carrying light dumbbells…"" ], “suggestions”: [ “WorkOut: "Brisk Walking Intervals"\nDescription: "Warm-up with 5 minutes of easy walking…"", “WorkOut: "Hill Walking"\nDescription: "Find a route with several hills…"", “WorkOut: "Power Walking"\nDescription: "Engage your core, pump your arms, and take longer strides…"" ], “safety”: [ “Wear comfortable and supportive shoes.", “Stay hydrated by drinking water before, during, and after the walk.", “Warm-up before starting and cool down afterwards.", “Be aware of your surroundings and watch out for traffic or other hazards.", “Listen to your body and stop if you feel any pain or discomfort.", “If walking in low light, wear reflective clothing and carry a light.", “Check the weather forecast and dress appropriately." ] } ]